
Simple quilted tote
Of all the quick projects that I love to make and give - A perfect sized quilted tote wins hands down.
They make the most perfect gift and are a great size for a trip to the library or the market.

Supply list.
1/2 yard of fabric for the outside
18" SF101 woven interfacing (fusible)
1/2 yard fabric for lining
2 - 19 x 21" pieces of batting
2 - 22" leather straps for handles.
Leather needle
Quilting clips
Basic sewing supplies

Cutting instructions
Cut 2 piece of outside fabric to measure 19 x 21"
Cut 2 pieces of lining fabric to measure 17 x 19 1/2"
Cut 2 pieces of batting to measure 19 x 21"
Cut 2 pieces of SF101 fusible woven interfacing to measure 17 x 19.5"
Cut 2 pieces of leather strapping to measure 22" each
Prepare the pieces
1. Fuse the woven interfacing to the wrong side of both lining pieces and set aside for now.

2. Make a quilt sandwich with batting and outside fabric. You may choose to add a backing fabric for the quilt sandwich but I am just using batting and the outside fabric piece.
Because the piece is so mall, I am not basting, however you may baste if desired.
3. Starting at the center of the outside fabric, Mark a straight line from top to bottom using an erasable pen or Hera marker. This is out starting point for quilting.

4. Attach your walking foot, in my case the Accufeed foot for my Janome M7. Always make sure to set your machine for the correct foot.
5. Set your stitch length to your desired length and starting at the top of the line, sew straight down the line as straight as possible.


6. Attach your quilt guide, most walking feet have a small hole on the back of the foot that allow you to easily adjust the guide. Using a ruler or tape measure, set the guide so it is 1" away from your previous stitched line.

7. With the guide running along the stitched line, sew another straight line.

8. Continue doing this until you have created quilted lines across the entire piece.

9. Flip the outside piece and repeat these steps to create a gridded 1" square quilting design.


Repeat this step with the other outside piece.
Assemble the bag
1. Cut both pieces to measure 17 x 19.5"
2. Using a ruler, draw a 3" square on each bottom corner of your outer and lining fabric pieces. cut the squares. (this will create a boxed corner)


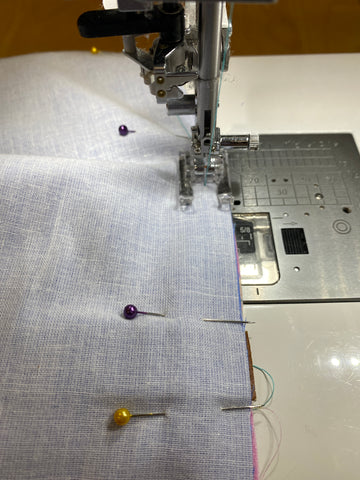
3. Pin the outside pieces RST and sew down both sides and across the bottom with a 3/8" seam allowance. Do not sew the cut bottom corners.


4. Repeat these steps with the lining pieces with the exception of the bottom edge. Make sure to leave a gap of at least 6".

5. Turn the outer bag piece to the side and open out and line up the square cut sides. Be sure the line up the center seam.

6. Sew with a 3/8" seam allowance.
7. Repeat this step with the other side then repeat with the lining pieces.
8. Turn the outside bag piece right side out.
9. Measure in 5" from each side seam at the top and mark with a pin or marker.

10. Use a quilt clip to hold the leather strap in place. Position both ends of the strap in place with the rough side of the leather facing out.
11. Attach your leather needle and sew across the top of the leather with a 1/4 " seam allowance. This step will hold the straps in place for the next step.

12. With the lining piece inside out, slide the outside bag inside the lining bag and pin across the top to secure both layers. I like to put a pin on both sides of the leather handle to hold it straight.

13. Sew around the top of the bag with a 1/2" seam allowance.
14. Pull the outer bag out through the hole in the lining.
15. Fold in the edges of the lining hole and sew close to the edge to close.

16. Carefully iron the top seam of the bag to prepare for topstitching, be careful not to iron the leather handles.

17. Sew a Topstitch around the top with a 3/8" seam allowance.

You are done, time to go and use that tote!